
I recently attended the American Council for an Energy-Efficient Economy (ACEEE) 2018 Hot Water Forum. This annual event brings together the most forward thinking policy makers, manufacturers, researchers and practitioners whose passion is how to make and deliver hot water efficiently and safely. As with the last water conference I attended, the development of a new pipe sizing methodology was a hot topic. I alluded to it in my last blog post, Innovations in Multifamily Plumbing, but let’s dig a little deeper, because I feel all residential projects should utilize this new method. To size pipes, you need to figure out the peak flow. Peak flow is determined by predicting how many fixtures are likely to be operating simultaneously and also considers the flow rate for each fixture. Currently, plumbing designers use Hunter’s Curve to determine peak flow. This handy curve was developed by Roy B. Hunter in 1940. Every fixture is assigned a fixture unit (e.g., one toilet = 2.5 fixture units). First, total up your fixture units and read the peak flow rate from the graph. Take this peak flow and factor in other design parameters like friction losses to get your pipe size. This will determine your water meter and distribution pipe sizes.
Table 1: Example Fixture Units (CA Plumbing Code—Table A 103.1)
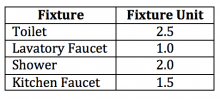
Figure 1: Hunter’s Curve (CA Plumbing Code) 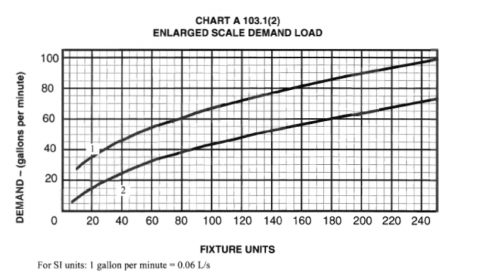
While simple and robust, the Hunter’s Curve produces a very conservative peak flow, resulting in supply and waste lines that are significantly oversized today. In the 1940s, toilets used 5 gallons per flush, but low-flow plumbing fixtures that use only 1.28 gallons are now mandated in California. Oversized pipes are undesirable for a number of reasons:
- Higher construction costs due to more material and bigger meter sizes
- Longer wait times for hot water to arrive because colder water sitting in the pipes has to be displaced first
- More water wasted while waiting for hot water, and increased water bills • Increased heat losses from hot water usage due to larger pipe surface area
- Low flow rate + big pipe size = lower water velocity, reducing scouring and allowing “gunk” (e.g., legionella) to build up in pipes
- Greater probability for stagnant water in lesser used stretches of pipe
There is now an alternative method that accounts for modern-day fixtures and usage patterns, thanks to a task group assembled by the International Association of Plumbing and Mechanical Officials (IAPMO)—the same folks that write the Uniform Plumbing Code (UPC) used in California. The alternative method is referred to as the Peak Water Demand Calculator and is published in Appendix M (sections 101.0-102.7) of the 2018 UPC. Even better, it is in the form of a freely accessible, handy excel calculator available here:
Figure 2: Peak Water Demand Calculator 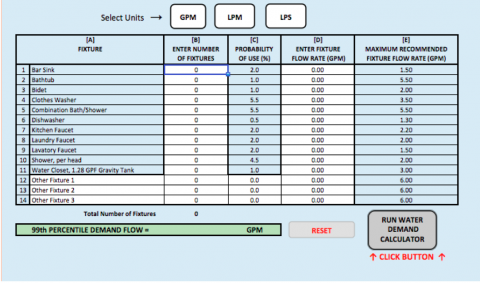
To use the Peak Water Demand Calculator, follow the usual procedures outlined in UPC Appendix A, except replace sections A 103.0-103.2 with the Appendix M sections and the Peak Water Demand Calculation. Dan Cole’s presentation at the ACEEE Hot Water Forum explains it all nicely. Dan’s presentation also includes examples showing the reduction in pipe size for sample projects. Single family projects would typically see one pipe size reduction (e.g., 1 ¼” to 1”). Pipe-size reductions can be even more substantial for multifamily projects. Next time I get a chance, I plan to run some of my past multifamily projects through the calculator. I’ll let you know what I find out—stay tuned! So now, the challenge is to get the word out and start putting this new calculation into practice. It is a little bit tricky because this is published in the 2018 UPC, while California is still held to the 2015 UPC. However, the future is now, so here are some ideas of how you might play your part to get things going:
- State and local code adopting officials: Adopt the 2018 UPC including Appendix M ASAP.
- Building departments/plan checkers: Embrace this new method and allow projects to utilize it.
- Developers: Ask your plumbing designer to use this methodology and support them in putting this forward as an alternative means and method to the building departments.
- Plumbing designers: Be a trailblazer. You know you’ve been grumbling about how the current method oversizes pipes. The solution has arrived!
- Plumbing installers: Follow the new design with the smaller pipes; don’t stick to your old rules of thumb. While you are at it, put 1” pipe insulation on all hot water pipes.
- Everyone else: Spread the word!
Next Challenge: Get the code to allow pipe diameters smaller than ½ inch!
Category:


